本帖最后由 PY学习笔记 于 2025-7-29 18:04 编辑
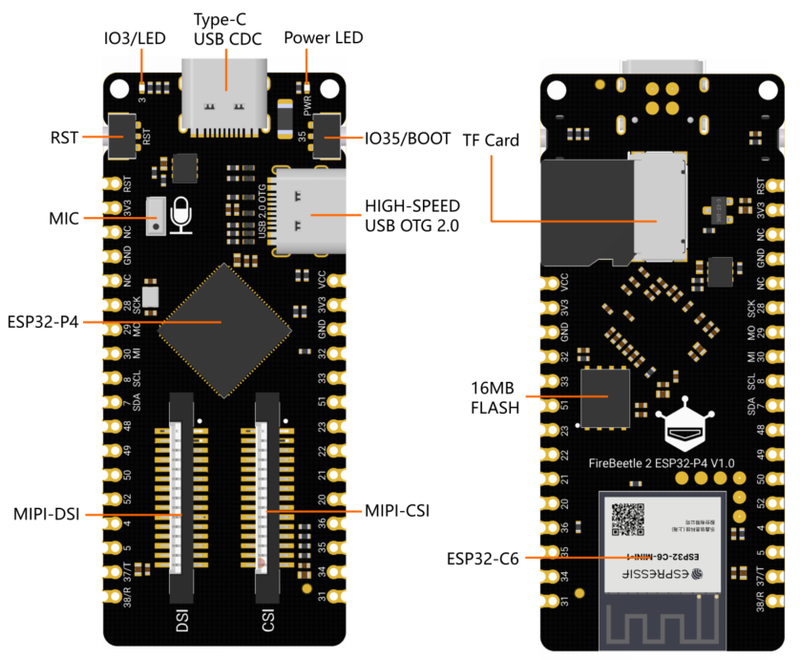
近期,dfrobot出了一款新的开发板——FireBeetle 2 ESP32-P4,板载ESP32P4,虽然没有内置的WIFI和BLE,但是它的性能十分的高,所以很有幸能体验到这款开发板 1.开发板介绍FireBeetle 2 ESP32-P4有很多种外设: Type-C USB CDC:Type-C USB烧录、调试接口 IO3/LED:板载LED引脚 Power LED:主板电源指示灯 RST:复位按键 IO35/BOOT:IO引脚/BOOT按键 MIC: MEMS PDM麦克风 HIGH-SPEED USB OTG 2.0: Type-C高速USB OTG 2.0 ESP32-P4:ESP32-P4芯片 MIPI-DSI: 两通道MIPI-DSI屏幕(兼容树莓派4B DSI屏幕线序) MIPI-CSI: 两通道MIPI-DSI屏幕(兼容树莓派4B CSI摄像头线序) TF Card: TF卡插槽 16MB FLASH: 16MB Flash存储 ESP32-C6:ESP32-C6-MINI-1模组,通过SDIO与ESP32-P4连接,用于扩展WiFi、蓝牙
2.micropython编译现在micropython官方还没实现,因为他们的代码很多都是旧版的,要更新得一段时间,这里我使用PR上大佬得半成品改了改实现了除USB、屏幕(DF官方还未实现)外的其它外设,仓库地址: 摄像头这里使用树莓派的摄像头实现,仓库地址: 考虑到后期需要使用jpeg的编码以及解码所以还需要使用cnadler86大佬的库,仓库地址: 接下来就可以开始编译了: 1.安装虚拟机我用的是虚拟机,也可以用其它的方式安装Linux系统进行编译,建议VMware+Ubuntu,参考: 2.ESP-IDF开发环境安装Ubuntu安装一些依赖包直接运行即可:
- sudo apt-get update
- sudo apt-get install git wget libncurses-dev flex bison gperf python3 python3-pip python3-setuptools python3-serial python3-click python3-cryptography python3-future python3-pyparsing python3-pyelftools cmake ninja-build ccache libffi-dev libssl-dev python-is-python3
3.pip源配置ESP-IDF安装过程中会在python virtual environment中使用pip安装所需的包,但默认情况下,pip使用的是国外的官方源,使得安装比较慢。可以使用以下命令将pip源配置到阿里云提升速度。 - pip config set global.index-url <a href="http://mirrors.aliyun.com/pypi/simple" target="_blank">http://mirrors.aliyun.com/pypi/simple</a>
- pip config set global.trusted-host mirrors.aliyun.com
4.下载仓库运行即可: - mkdir -p ~/esp
- cd ~/esp
- git clone <a href="https://gitee.com/EspressifSystems/esp-gitee-tools.git" target="_blank">https://gitee.com/EspressifSystems/esp-gitee-tools.git</a>
- git clone <a href="https://gitee.com/EspressifSystems/esp-idf.git" target="_blank">https://gitee.com/EspressifSystems/esp-idf.git</a>
- git clone -b esp32p4 <a href="https://github.com/Vincent1-python/micropython.git" target="_blank">https://github.com/Vincent1-python/micropython.git</a>
- git clone <a href="https://github.com/Vincent1-python/micropython_csi_camera.git" target="_blank">https://github.com/Vincent1-python/micropython_csi_camera.git</a>
- git clone <a href="https://github.com/cnadler86/mp_jpeg" target="_blank">https://github.com/cnadler86/mp_jpeg</a>
5.切换ESP-IDF的版本
- cd esp-idf
- git checkout v5.4.1
6.配置esp-idf官方为了解决国内开发者从github克隆esp相关仓库慢的问题,已将esp-idf和部分重要仓库及其关联的子模块镜像到了jihu。根据官方建议,使用以下命令将仓库的URL替换为jihu的URL,并更新子模块,完成安装。 - cd ~/esp/esp-gitee-tools
- ./jihu-mirror.sh set
- ./submodule-update.sh ~/esp/esp-idf/
- ./install.sh ~/esp/esp-idf/
可能会提示Python virtual environment未安装成功。按照建议执行以下命令,并重新安装。 - sudo apt install python3.10-venv
- ./install.sh ~/esp/esp-idf/
安装一大堆东西后,提示(xx是用户名): - All done! You can now run:
- . /home/xx/esp/esp-idf/export.sh
表示安装成功。添加环境变量: - cd ~/esp/esp-idf
- source export.sh
提示:idf.py buildinstall.sh步骤只需要执行一次。每次新会话都需要使用export.sh 7.确认esp-idf版本
复制代码
再次确认ESP-IDFv5.4.1。 8.构建固件
- cd ~/esp/micropython
- make -C mpy-cross
- cd ports/esp32
- make submodules
- make
如果顺利的话,就会在~/esp/micropython/ports/esp32/build-FireBeetle_2_ESP32_P4/中生成一个firmware.bin固件。 9.绑定两个驱动在~/esp中新建一个文件micropython.cmake写入以下代码: - include(${CMAKE_CURRENT_LIST_DIR}/micropython_csi_camera/micropython.cmake)
- include(${CMAKE_CURRENT_LIST_DIR}/mp_jpeg/src/micropython.cmake)
10.最终的编译运行: - make clean
- make USER_C_MODULES=~/esp/micropython.cmake
运行完成后,会在~/esp/micropython/ports/esp32/build-FireBeetle_2_ESP32_P4/中生成一个firmware.bin固件。复制到合适的地方开始烧录。 3.烧录网上有很多方式我就不详细写了,注意烧录地址为:0x002000 4.正式体验这里板载外设为主: LED测试: - from machine import Pin
- import time
-
- led = Pin(3,Pin.OUT)
-
- while True:
- led.value(1)
- time.sleep(1)
- led.value(0)
- time.sleep(1)
麦克风测试: - import os
- from machine import Pin
- from machine import I2S
-
- SCK_PIN = 12
- #WS_PIN = 25
- SD_PIN = 9
- I2S_ID = 0
- BUFFER_LENGTH_IN_BYTES = 40000
-
- # ======= AUDIO CONFIGURATION =======
- WAV_FILE = "mic.wav"
- RECORD_TIME_IN_SECONDS = 4
- WAV_SAMPLE_SIZE_IN_BITS = 16
- FORMAT = I2S.MONO
- SAMPLE_RATE_IN_HZ = 8000
- # ======= AUDIO CONFIGURATION =======
-
- format_to_channels = {I2S.MONO: 1, I2S.STEREO: 2}
- NUM_CHANNELS = format_to_channels[FORMAT]
- WAV_SAMPLE_SIZE_IN_BYTES = WAV_SAMPLE_SIZE_IN_BITS // 8
- RECORDING_SIZE_IN_BYTES = (
- RECORD_TIME_IN_SECONDS * SAMPLE_RATE_IN_HZ * WAV_SAMPLE_SIZE_IN_BYTES * NUM_CHANNELS
- )
-
-
- def create_wav_header(sampleRate, bitsPerSample, num_channels, num_samples):
- datasize = num_samples * num_channels * bitsPerSample // 8
- o = bytes("RIFF", "ascii") # (4byte) Marks file as RIFF
- o += (datasize + 36).to_bytes(
- 4, "little"
- ) # (4byte) File size in bytes excluding this and RIFF marker
- o += bytes("WAVE", "ascii") # (4byte) File type
- o += bytes("fmt ", "ascii") # (4byte) Format Chunk Marker
- o += (16).to_bytes(4, "little") # (4byte) Length of above format data
- o += (1).to_bytes(2, "little") # (2byte) Format type (1 - PCM)
- o += (num_channels).to_bytes(2, "little") # (2byte)
- o += (sampleRate).to_bytes(4, "little") # (4byte)
- o += (sampleRate * num_channels * bitsPerSample // 8).to_bytes(4, "little") # (4byte)
- o += (num_channels * bitsPerSample // 8).to_bytes(2, "little") # (2byte)
- o += (bitsPerSample).to_bytes(2, "little") # (2byte)
- o += bytes("data", "ascii") # (4byte) Data Chunk Marker
- o += (datasize).to_bytes(4, "little") # (4byte) Data size in bytes
- return o
-
-
- audio_in = I2S(
- I2S_ID,
- sck=Pin(SCK_PIN),
- #ws=Pin(WS_PIN),
- sd=Pin(SD_PIN),
- mode=I2S.PDM_RX,
- bits=WAV_SAMPLE_SIZE_IN_BITS,
- format=FORMAT,
- rate=SAMPLE_RATE_IN_HZ * 4,
- ibuf=BUFFER_LENGTH_IN_BYTES,
-
-
- )
-
- # allocate sample arrays
- # memoryview used to reduce heap allocation in while loop
- mic_samples = bytearray(40000)
- mic_samples_mv = memoryview(mic_samples)
-
-
- recording_buffer = bytearray(RECORDING_SIZE_IN_BYTES)
- bytes_received = 0
-
- print("Recording size: {} bytes".format(RECORDING_SIZE_IN_BYTES))
- print("========== START RECORDING ==========")
- try:
- while bytes_received < RECORDING_SIZE_IN_BYTES:
- # read a block of samples from the I2S microphone
- bytes_read = audio_in.readinto(mic_samples_mv)
- if bytes_read > 0:
- bytes_to_write = min(
- bytes_read, RECORDING_SIZE_IN_BYTES - bytes_received
- )
- recording_buffer[bytes_received:bytes_received+bytes_to_write] = mic_samples_mv[0:bytes_to_write]
- print('FILL', bytes_received, bytes_to_write)
- bytes_received += bytes_read
-
- print("========== DONE RECORDING ==========")
- except (KeyboardInterrupt, Exception) as e:
- print("caught exception {} {}".format(type(e).__name__, e))
-
-
- # Write to WAV
- wav = open(WAV_FILE, "wb")
-
- # create header for WAV file and write to SD card
- wav_header = create_wav_header(
- SAMPLE_RATE_IN_HZ,
- WAV_SAMPLE_SIZE_IN_BITS,
- NUM_CHANNELS,
- SAMPLE_RATE_IN_HZ * RECORD_TIME_IN_SECONDS,
- )
- wav.write(wav_header)
-
- # write samples to WAV file
- wav.write(recording_buffer)
-
- # cleanup
- wav.close()
- print("Wrote ", WAV_FILE)
- audio_in.deinit()
SD卡测试: - from machine import Pin,SDCard
- import os
-
-
- sd = SDCard(slot=0,width=4, sck=43, cmd=44, data=(39, 40, 41, 42), freq=40000000)
-
- os.mount(sd, '/sd')
- os.listdir('/sd')
- print(os.listdir('/sd'))
- os.listdir('/sd')
联网测试: - import network,time
- def connect():
- wlan = network.WLAN(network.STA_IF)
- wlan.active(True)
- if not wlan.isconnected():
- print('esp32p4正在联网',end="")
- wlan.connect('SSID', 'PWD')
- while not wlan.isconnected():
- print(".",end="")
- time.sleep(1)
- print('\n网络信息为: ', wlan.ifconfig())
-
- connect()
摄像头拍照测试: - import camera,time,jpeg
- camera.init()
- time.sleep(5)
- img = camera.capture() # bytes
- camera.deinit()
- with open("capture.jpg", "wb") as f:
- f.write(img)
-
- print("JPEG 编码完成")
网页图传测试: - from microdot import Microdot
- import time,jpeg,camera,network
-
- def connect():
- wlan = network.WLAN(network.STA_IF)
- wlan.active(True)
- if not wlan.isconnected():
- print('esp32p4正在联网',end="")
- wlan.connect('SSID', 'PWD')
- while not wlan.isconnected():
- print(".",end="")
- time.sleep(1)
- print('\n网络信息为: ', wlan.ifconfig())
- ifconfig = wlan.ifconfig()
- print('请在浏览器打开:{}:5000'.format(ifconfig[0]))
-
- connect()
- app = Microdot()
- camera.init()
-
-
- @app.route('/')
- def index(request):
- return '''<!doctype html>
- <html>
- <head>
- <title>ESP32P4网页图传</title>
- <meta charset="UTF-8">
- </head>
- <body>
- <h1>ESP32P4网页图传:</h1>
- <img src="/video_feed" width="50%">
- </body>
- </html>''', 200, {'Content-Type': 'text/html; charset=utf-8'}
-
- @app.route('/video_feed')
- def video_feed(request):
- def stream():
- yield b'--frame\r\n'
- while True:
- frame = camera.capture()
- yield b'Content-Type: image/jpeg\r\n\r\n' + frame + \
- b'\r\n--frame\r\n'
- gc.collect()
- #time.sleep_ms(50)
-
- return stream(), 200, {'Content-Type':
- 'multipart/x-mixed-replace; boundary=frame'}
-
-
- if __name__ == '__main__':
- app.run(debug=True)
- camera.deinit()
点灯视频:
网页图传效果视频:
| 

 沪公网安备31011502402448

 置顶卡
置顶卡 变色卡
变色卡 千斤顶
千斤顶