1. 简介:
经过前面三篇教程帖子(yolov8n在行空板上的运行,yolov10n在行空板上的运行,Mediapipe在行空板上的运行)的介绍,我们对如何使用官方代码在行空板上运行物体检测的AI模型有了基本的概念,并对常见的模型进行了简单的测试和对比。
在行空板上YOLO和Mediapipe图片物体检测的测试中,我们对于行空板上使用YOLO和Mediapipe进行图片物体检测进行了测试。
进一步的,本文将
- 对不同模型的视频物体检查进行详细的对比分析;
- 进行针对在行空板上的视频物体检测进行代码编写和优化;
- 对不同模型的帧率对比测试。
Note: 因为视频物体检测和图片物体检测用的是相同的模型,所以在检测准确性上不会有区别,所以检测结果的准确性可以直接参考以行空板上YOLO和Mediapipe图片物体检测的测试所做的测试。
2. yolo视频物体检测
2.1 不同onnx模型导出设置的表现对比
设置和代码
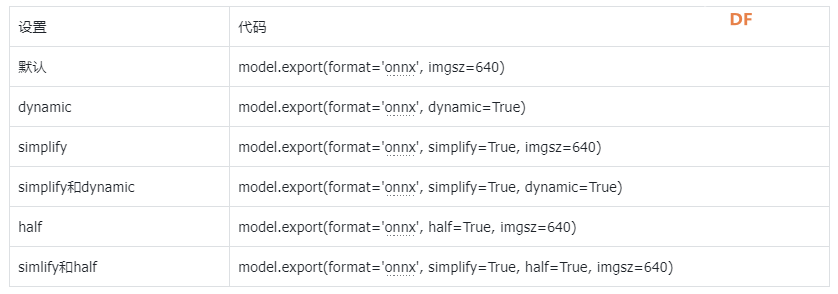
导出onnx模型的官方代码为:
- from ultralytics import YOLO
-
- # Load a pretrained YOLOv10n model
- model = YOLO("yolov10n.pt")
-
- #export onnx
- model.export(format='onnx')
yolo系列模型在使用官方代码导出onnx格式模型的时候,有几个不同的选项: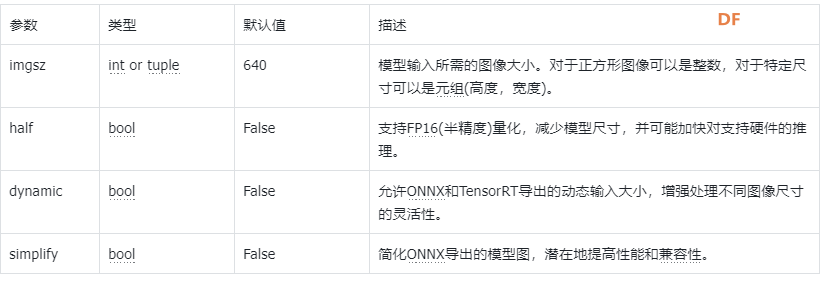
- 其中,dynamic与imgsz不兼容;dynamic与half不兼容。
我们将分别对这几个选项的不同组合进行对比测试,分辨率都采用640。共包括以下模型:
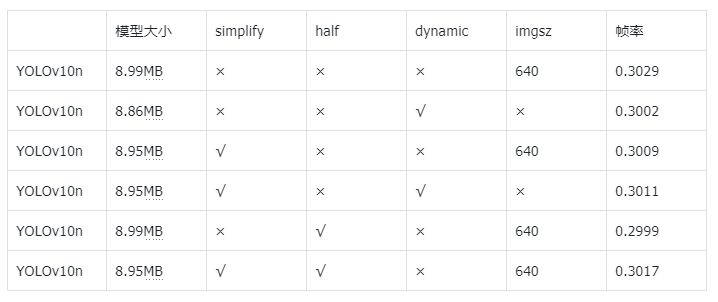
测试结果
对不同设置的模型进行行空板+USB摄像头的视频物体检测测试,结果如下:
分析
通过测试结果的统计,可以分析得到以下特点:
- dynamic设置可以略微减小模型大小,也会略微降低运行速度;
- simplify也可以略微减小模型大小,但极不显著,也会略微降低运行速度;
- 如果simplify和dynamic同时开启,不如值开启dynamic在模型尺寸上减少的明显;
- half设置并没有速度上的提升,反而有降低,这是因为行空板没有半精度优化的硬件支持。
小结- 如果能事先知道输入图片的尺寸,就不要使用任何参数设置,只用imgsz设置图片尺寸;
- 如果实现不知道图片输入的尺寸,就使用dynamic=True;
- 不要设置half=True和simplify=True
2.2 不同尺寸输入的表现对比
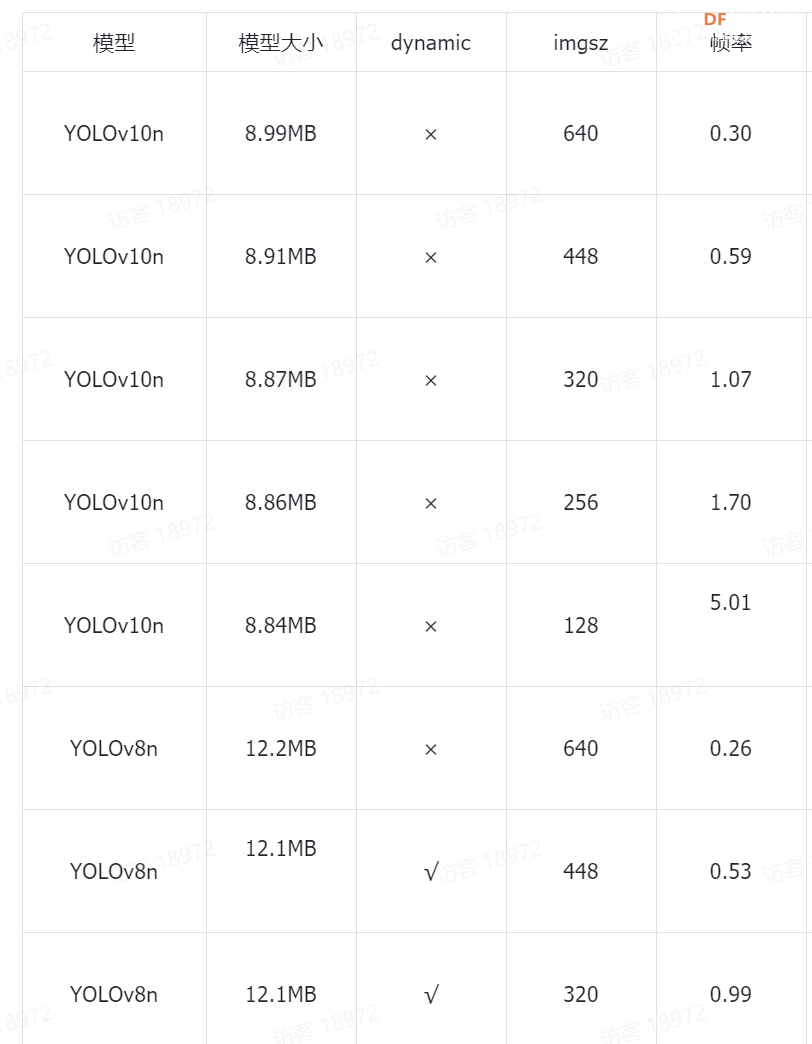
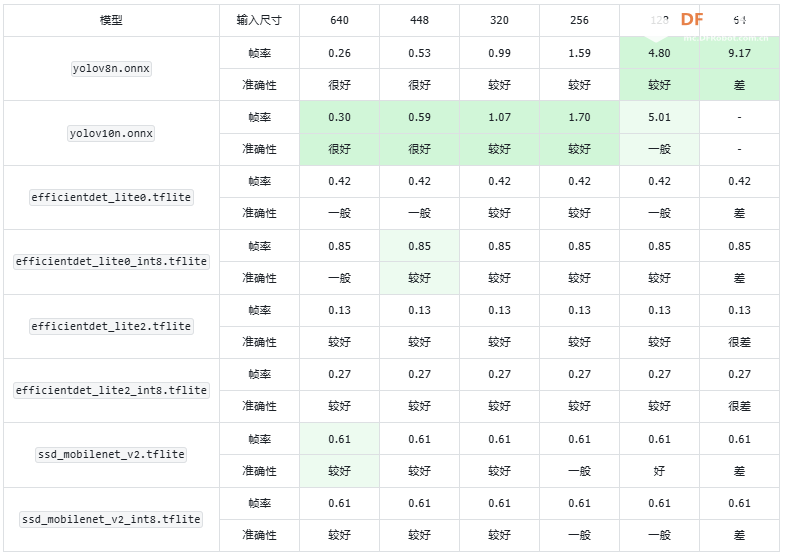
yolo的测试结果(模型文件见附录)
分析
可以看出,随着输入尺寸的减小,帧率显著提高。
yolov10n的帧率比yolov8n略高10%左右,同时模型大小减少25%。
小结- 对于视频检测,在行空板上以128的分辨率运行勉强可以使用;
- 建议选择yolov10n,相较v8,内存占用和速度方面都有优势。
3. Mediapipe视频物体检测
设置
针对Mediapipe中的三个模型,我们分别测试了非量化和int8量化下的不同分辨率。
分辨率包括:
640、448、320、256、128
测试结果
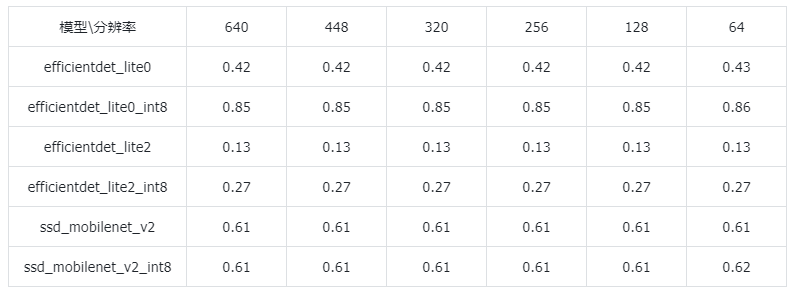
小结
- 与图片的目标检测结果类似,不同的分辨率对这些模型而言没有影响;
- 对于efficientdet_lite0和efficientdet_lite2,int8量化可以显著提速;int8量化对于ssd_mobilenet_v2没有影响
4. 视频物体检测总结
我们在统计测试后发现了以下特点:
- yolo系列随着图片分辨率下调,检测耗时显著减少;而Mediapipe不明显。这说明在小分辨率图片检测中,yolo系列有显著的速度优势;
- det的两个模型进行int8量化之后速度显著提升,几乎不会损失准确性;
- Mediapipe的模型在较大分辨率的时候相比yolo有显著的速度优势,但是准确性略低一点。在应用的时候,需要在准确性和速度上进行权衡。
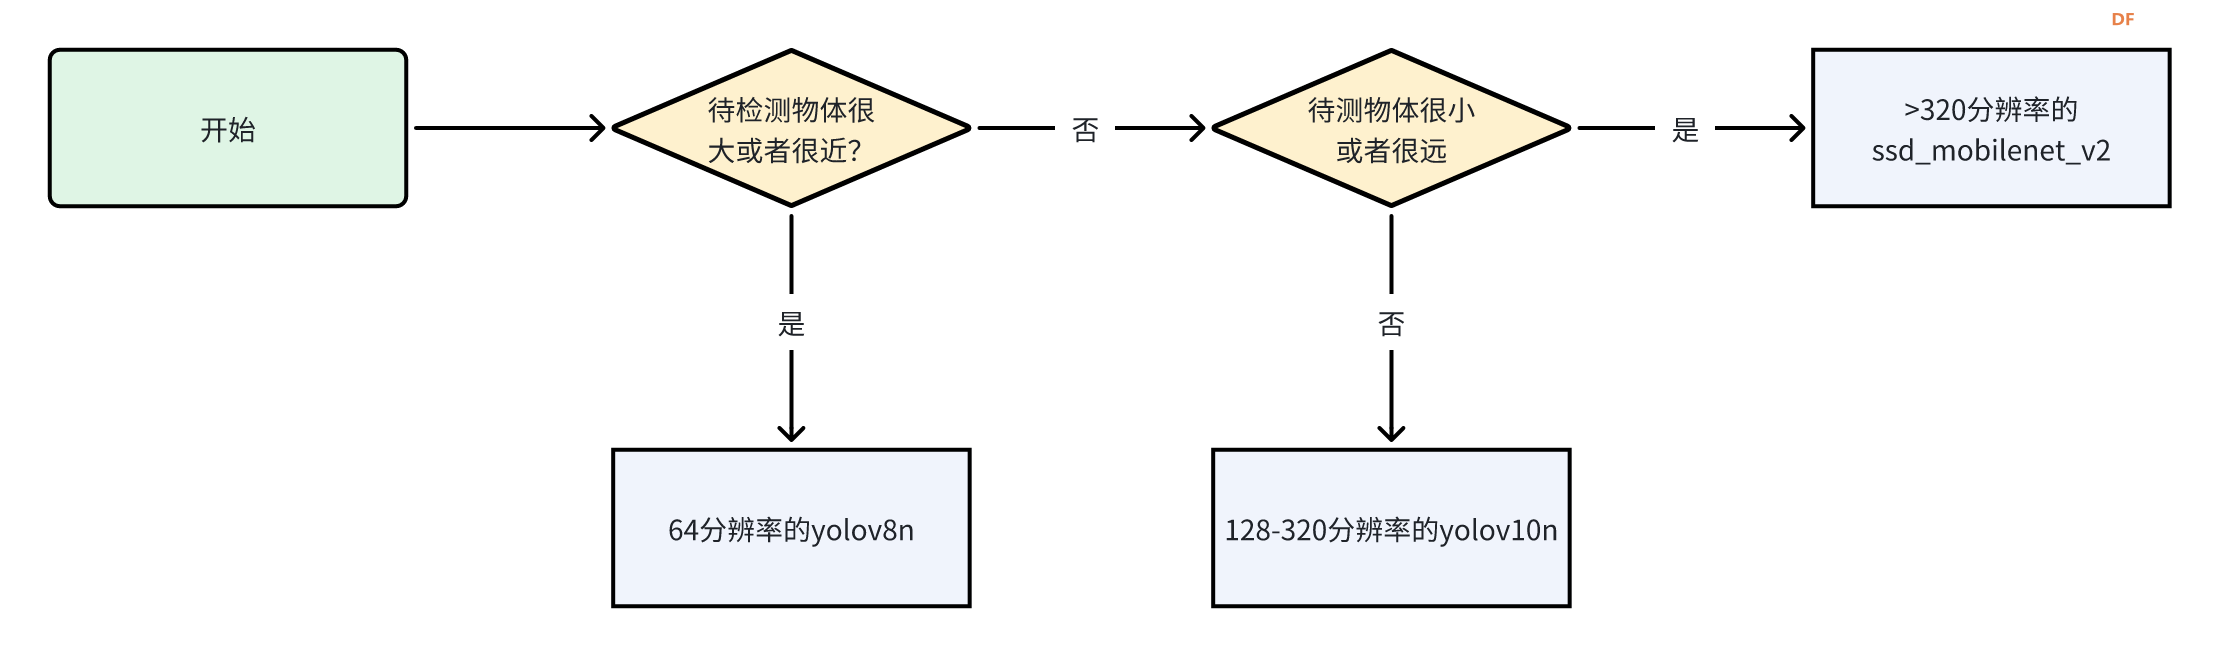
模型选择建议
- 限于视频帧率问题,我们认为最多使用320分辨率,使帧率达到1;
- 如果物体较近或者较大,在低分辨率图片上也可以方便地提取特征,这种情况下推荐使用较低分辨率而速度较快的模型,如64帧率的yolov8n;
- 如果物体较远或者物体较小,则需要分辨率更高才能提取到足够的特征,这种情况下推荐选择yolov10n。如果需要更高分辨率的图片,而且可以接收帧率较低,可以采用ssd_mobilenet_v2.tflite模型。可以参考下面的流程来选取模型:
附录
1. 使用yolov10n视频检测的代码
行空板+USB摄像头使用yolov10n进行物体检测的代码代码如下:
- import cv2
- import numpy as np
- import onnxruntime as ort
- import yaml
- import time
-
- def preprocess(frame, input_size):
- #这里的resize使用nearest,可以提速大约0.3-0.5帧
- image = cv2.resize(frame, input_size,interpolation=cv2.INTER_NEAREST)
- # 转换图片到数组
- image_data = np.array(image).transpose(2, 0, 1) # 转换成CHW
- image_data = image_data.astype(np.float32)
- image_data /= 255.0 # 归一化
- image_data = np.expand_dims(image_data, axis=0) # 增加batch维度
- return image_data
-
- def postprocess(output, image, input_size, show_size, classes):
- for detection in output:
- x1, y1, x2, y2, conf , class_id = detection
- if conf > 0.4:
- x1 = int(x1 / input_size[0] * show_size[0])
- x2 = int(x2 / input_size[0] * show_size[0])
- y1 = int(y1 / input_size[1] * show_size[1])
- y2 = int(y2 / input_size[1] * show_size[1])
- class_id = int(class_id)
- cv2.rectangle(image, (x1, y1), (x2, y2), (255, 0, 0), 2) # 画框
- class_name = classes[class_id]
- cv2.putText(image, class_name, (x1, y1-10), cv2.FONT_HERSHEY_SIMPLEX, 0.5, (255, 255, 255), 2)
- return image
-
- def main():
- input_size = (128, 128)
-
- with open('ultralytics/cfg/datasets/coco.yaml', 'r', encoding='utf-8') as f:
- data = yaml.safe_load(f)
- classes = data['names']
-
- window_name = 'FullScreen Image'
- cv2.namedWindow(window_name, cv2.WINDOW_NORMAL)
- cv2.setWindowProperty(window_name, cv2.WND_PROP_FULLSCREEN, cv2.WINDOW_FULLSCREEN)
- # 加载模型
- session = ort.InferenceSession('yolov10n.onnx')
- input_name = session.get_inputs()[0].name
-
- # 打开摄像头。
- cap = cv2.VideoCapture(0)
- if not cap.isOpened():
- print("Cannot open camera")
- exit()
- prev_time = 0
- while True:
- ret, frame = cap.read()
- show_size = [320,240]
-
- if not ret:
- print("Can't receive frame (stream end?). Exiting ...")
- break
- current_time = time.time()
- # 预处理图像
- input_tensor = preprocess(frame, input_size)
-
- # 进行推理
- outputs = session.run(None, {input_name: input_tensor})
- output = outputs[0][0]
-
- # 后处理
- show_image = postprocess(output, frame, input_size, show_size, classes)
-
- fps = 1.0 / (current_time - prev_time)
- prev_time = current_time # 更新前一帧的时间
- cv2.putText(show_image, f"FPS: {fps:.2f}", (10, 30), cv2.FONT_HERSHEY_SIMPLEX, 1, (255, 255, 255), 2)
-
- # 显示结果
- cv2.imshow(window_name, show_image)
- if cv2.waitKey(1) == ord('q'):
- break
-
- # 释放资源
- cap.release()
- cv2.destroyAllWindows()
-
- if __name__ == '__main__':
- main()
2. 使用Mediapipe视频检测的代码
行空板+USB摄像头使用Mediapipe进行物体检测的代码代码如下:
- import numpy as np
- import mediapipe as mp
- from mediapipe.tasks import python
- from mediapipe.tasks.python import vision
- import cv2
- import time
-
- input_size = (640,640)
- # STEP 1: Import the necessary modules.
- base_options = python.BaseOptions(model_asset_path='efficientdet_lite0.tflite')
- options = vision.ObjectDetectorOptions(base_options=base_options,
- score_threshold=0.5)
- detector = vision.ObjectDetector.create_from_options(options)
-
- # STEP 2: Create an ObjectDetector object.
- MARGIN = 10 # pixels
- ROW_SIZE = 10 # pixels
- FONT_SIZE = 1
- FONT_THICKNESS = 1
- TEXT_COLOR = (255, 0, 0) # red
-
- def visualize(image, detection_result) -> np.ndarray:
- """Draws bounding boxes on the input image and return it.
- Args:
- image: The input RGB image.
- detection_result: The list of all "Detection" entities to be visualize.
- Returns:
- Image with bounding boxes.
- """
- for detection in detection_result.detections:
- # Draw bounding_box
- bbox = detection.bounding_box
- start_point = bbox.origin_x, bbox.origin_y
- end_point = bbox.origin_x + bbox.width, bbox.origin_y + bbox.height
- cv2.rectangle(image, start_point, end_point, TEXT_COLOR, 3)
-
- # Draw label and score
- category = detection.categories[0]
- category_name = category.category_name
- probability = round(category.score, 2)
- result_text = category_name + ' (' + str(probability) + ')'
- text_location = (MARGIN + bbox.origin_x,
- MARGIN + ROW_SIZE + bbox.origin_y)
- cv2.putText(image, result_text, text_location, cv2.FONT_HERSHEY_PLAIN,
- FONT_SIZE, TEXT_COLOR, FONT_THICKNESS)
-
- return image
-
- # STEP 3: Initialize the video capture from the webcam.
- cap = cv2.VideoCapture(0)
- prev_time = 0
-
- while cap.isOpened():
- ret, frame = cap.read()
- if not ret:
- break
- frame = cv2.resize(frame, input_size, interpolation=cv2.INTER_NEAREST)
- # Convert the frame to the format required by MediaPipe.
- image = mp.Image(image_format=mp.ImageFormat.SRGB, data=frame)
-
- # STEP 4: Detect objects in the frame.
- detection_result = detector.detect(image)
-
- # STEP 5: Process the detection result. In this case, visualize it.
- annotated_frame = visualize(frame, detection_result)
-
- # Calculate and display the frame rate
- current_time = time.time()
- fps = 1 / (current_time - prev_time)
- prev_time = current_time
- fps_text = f'FPS: {fps:.2f}'
- print(fps_text)
- cv2.putText(annotated_frame, fps_text, (10, 30), cv2.FONT_HERSHEY_SIMPLEX, 1, (0, 255, 0), 2)
-
- cv2.imshow('Object Detection', annotated_frame)
-
- # Break the loop if the user presses 'q'.
- if cv2.waitKey(1) & 0xFF == ord('q'):
- break
-
- # Release the resources.
- cap.release()
- cv2.destroyAllWindows()
模型文件网盘链接:https://pan.baidu.com/s/18UpdaOMlC8uBsydk5DpwJQ?pwd=2t9f 提取码: 2t9f
|


 沪公网安备31011502402448

 置顶卡
置顶卡 变色卡
变色卡 千斤顶
千斤顶
 萌萌哒新人
萌萌哒新人
 活跃会员
活跃会员
 编辑选择奖
编辑选择奖