本帖最后由 gada888 于 2022-7-28 16:40 编辑
突然心血来潮.想出一个入门级的Arduino 触控教程.给新手一点创新思路. 思来想去想到了拟人化一个常用的食物.这次胡萝卜被选中了.因为要按上眼睛,胡萝卜皮硬,比较容易被粘上.用到的一个DF的MP3模块和一个触控ADCTouch库来完成任务.
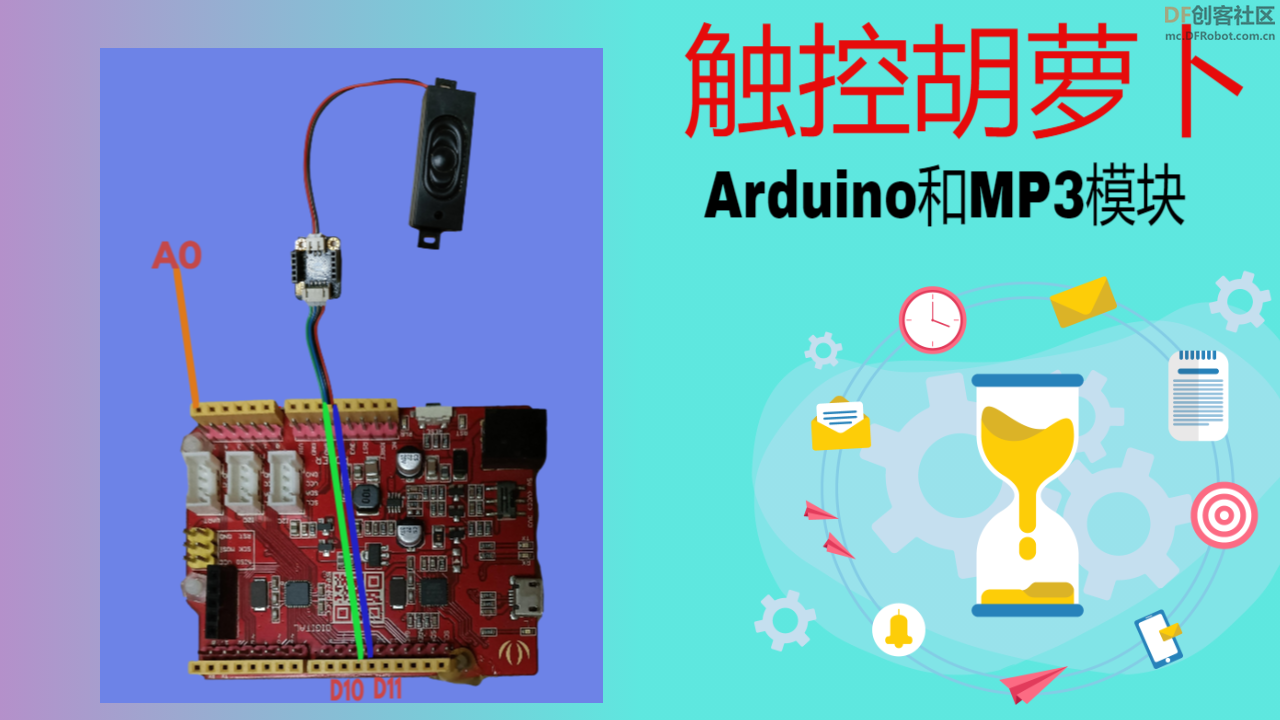
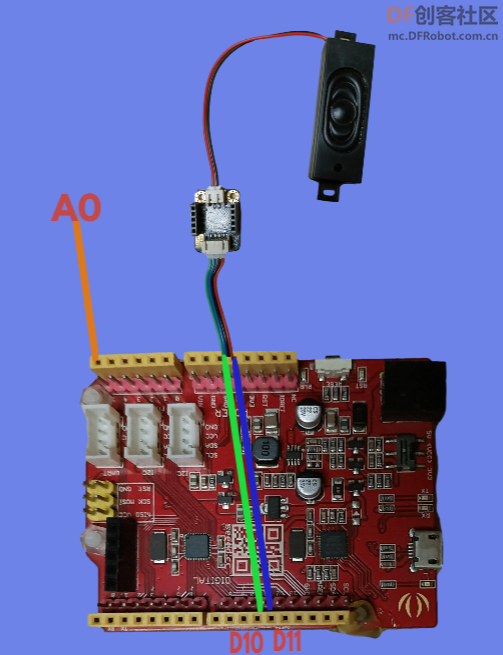
下面是实物接线图
注意:电源输入是4.2V.直接接入到UNO的5V接线口.原因是电压提示后电流也变大.从而影响了MP3喇叭的音质.只有4.2V或以下才能听不到噪音.但供电电压再小.音量会越来越小.
硬件清单
ADCTouch库是用arduino的模拟脚位来设计触控功能的,它用了AVR芯片的内部功能类测量外部物体的电容值.代码中的ref0 = ADCTouch.read(A0, 500); 这个阈值500可以调整的.实测这个值是在通电后并在人手碰到胡萝卜后,MP3模块就会发出声音.
代码中的int ref0, ref1, ref2, ref3, ref4, ref5;这个设定是指定变量,用来给A0-A6六个模拟脚位赋值.实际我只用了A0一个模拟口.当然如果需要.可以连更多的线.用来发不同的声音文件.
代码中的SoftwareSerial Serial1(10, 11);.指为MP3模块的串口线设定为软串口.并把D10给TX,D1给RX.
MP3文件是通过下面的软件生成的
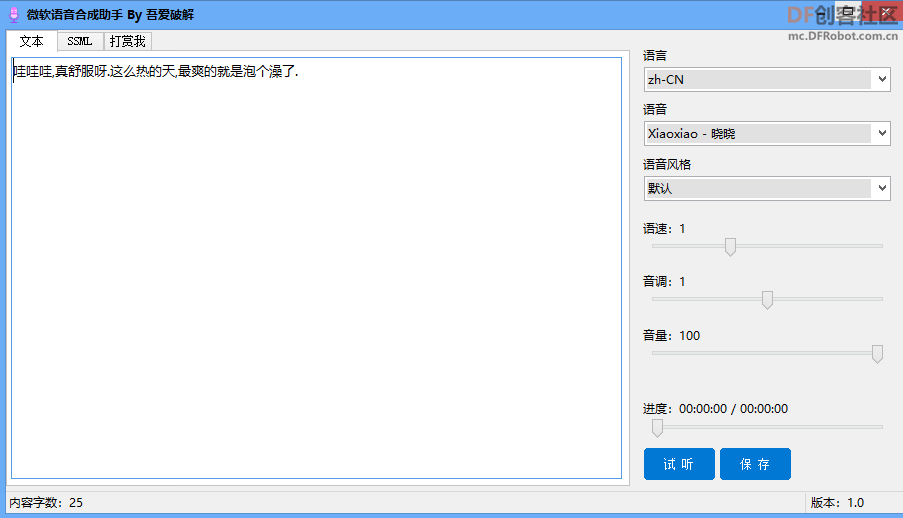
而生成的MP3文件会拷贝到DF MP3模块里面.方式是通过连接USB线到MP3模块.这个MP3模块有个内置存储,不过存不了大的MP3文件.MP3文件名的开头必须是000+数字

下面是烧录成功的代码
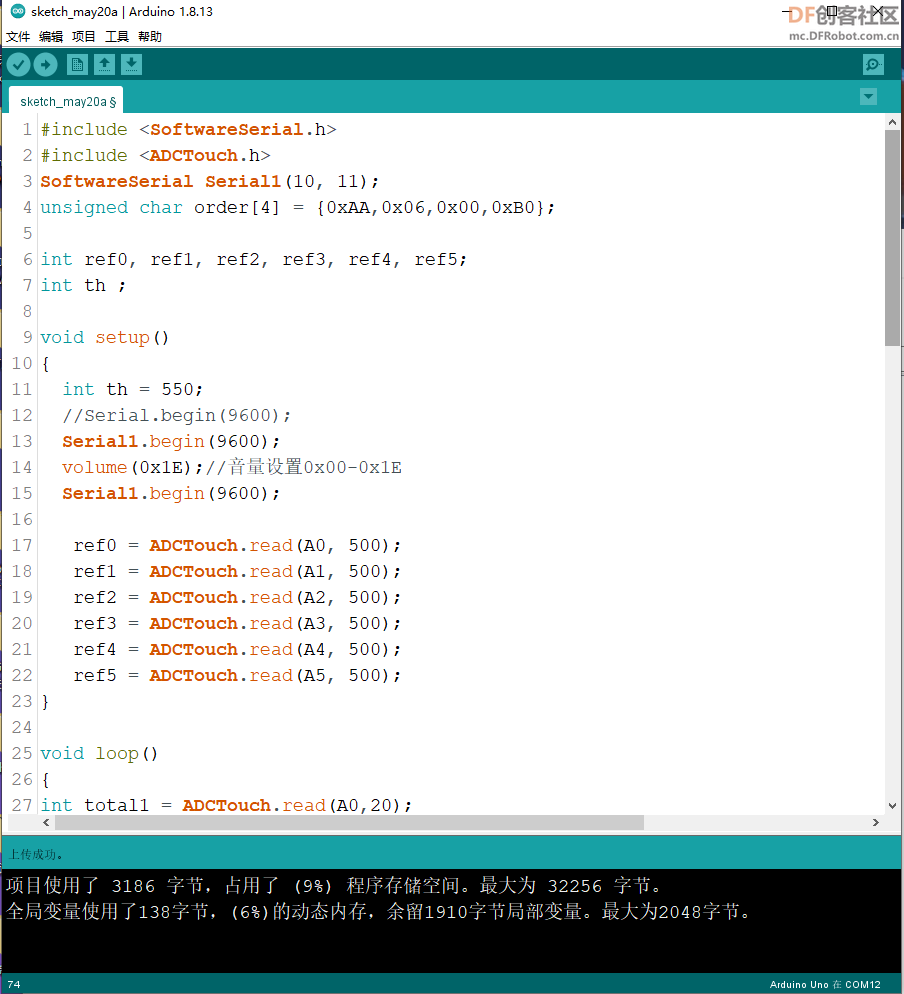
- #include <SoftwareSerial.h>
- #include <ADCTouch.h>
- SoftwareSerial Serial1(10, 11);
- unsigned char order[4] = {0xAA,0x06,0x00,0xB0};
-
- int ref0, ref1, ref2, ref3, ref4, ref5;
- int th ;
-
- void setup()
- {
- int th = 550;
- //Serial.begin(9600);
- Serial1.begin(9600);
- volume(0x1E);//音量设置0x00-0x1E
- Serial1.begin(9600);
-
- ref0 = ADCTouch.read(A0, 500);
- ref1 = ADCTouch.read(A1, 500);
- ref2 = ADCTouch.read(A2, 500);
- ref3 = ADCTouch.read(A3, 500);
- ref4 = ADCTouch.read(A4, 500);
- ref5 = ADCTouch.read(A5, 500);
- }
-
- void loop()
- {
- int total1 = ADCTouch.read(A0,20);
- int total2 = ADCTouch.read(A1,20);
- int total3 = ADCTouch.read(A2,20);
- int total4 = ADCTouch.read(A3,20);
- int total5 = ADCTouch.read(A4,20);
- int total6 = ADCTouch.read(A5,20);
-
- total1 -= ref0;
- total2 -= ref1;
- total3 -= ref2;
- total4 -= ref3;
- total5 -= ref4;
- total6 -= ref5;
-
- if (total1 > 100 && total1 > th ) {
- play(0x01);
- // Serial.println("o1");
- }
-
- if (total2 > 100 && total2 > th ) {
- play(0x02);
- //Serial.println("o2");
- }
-
- if (total3 > 100 && total3 > th ) {
- play(0x03);
- //Serial.println("o3");
- }
-
- if (total4 > 100 && total4 > th ) {
- play(0x04);
- //Serial.println("o4");
- }
-
- if (total5 > 100 && total5 > th ) {
- play(0x05);
- //Serial.println("o5");
- }
-
- if (total6 > 100 && total6 > th ) {
- play(0x06);
- //Serial.println("o6");
- }
- // do nothing
- delay(1);
- }
-
- void play(unsigned char Track)
- {
- unsigned char play[6] = {0xAA,0x07,0x02,0x00,Track,Track+0xB3};//0xB3=0xAA+0x07+0x02+0x00,即最后一位为校验和
- Serial1.write(play,6);
- }
- void volume( unsigned char vol)
- {
- unsigned char volume[5] = {0xAA,0x13,0x01,vol,vol+0xBE};//0xBE=0xAA+0x13+0x01,即最后一位为校验和
- Serial1.write(volume,5);
- }
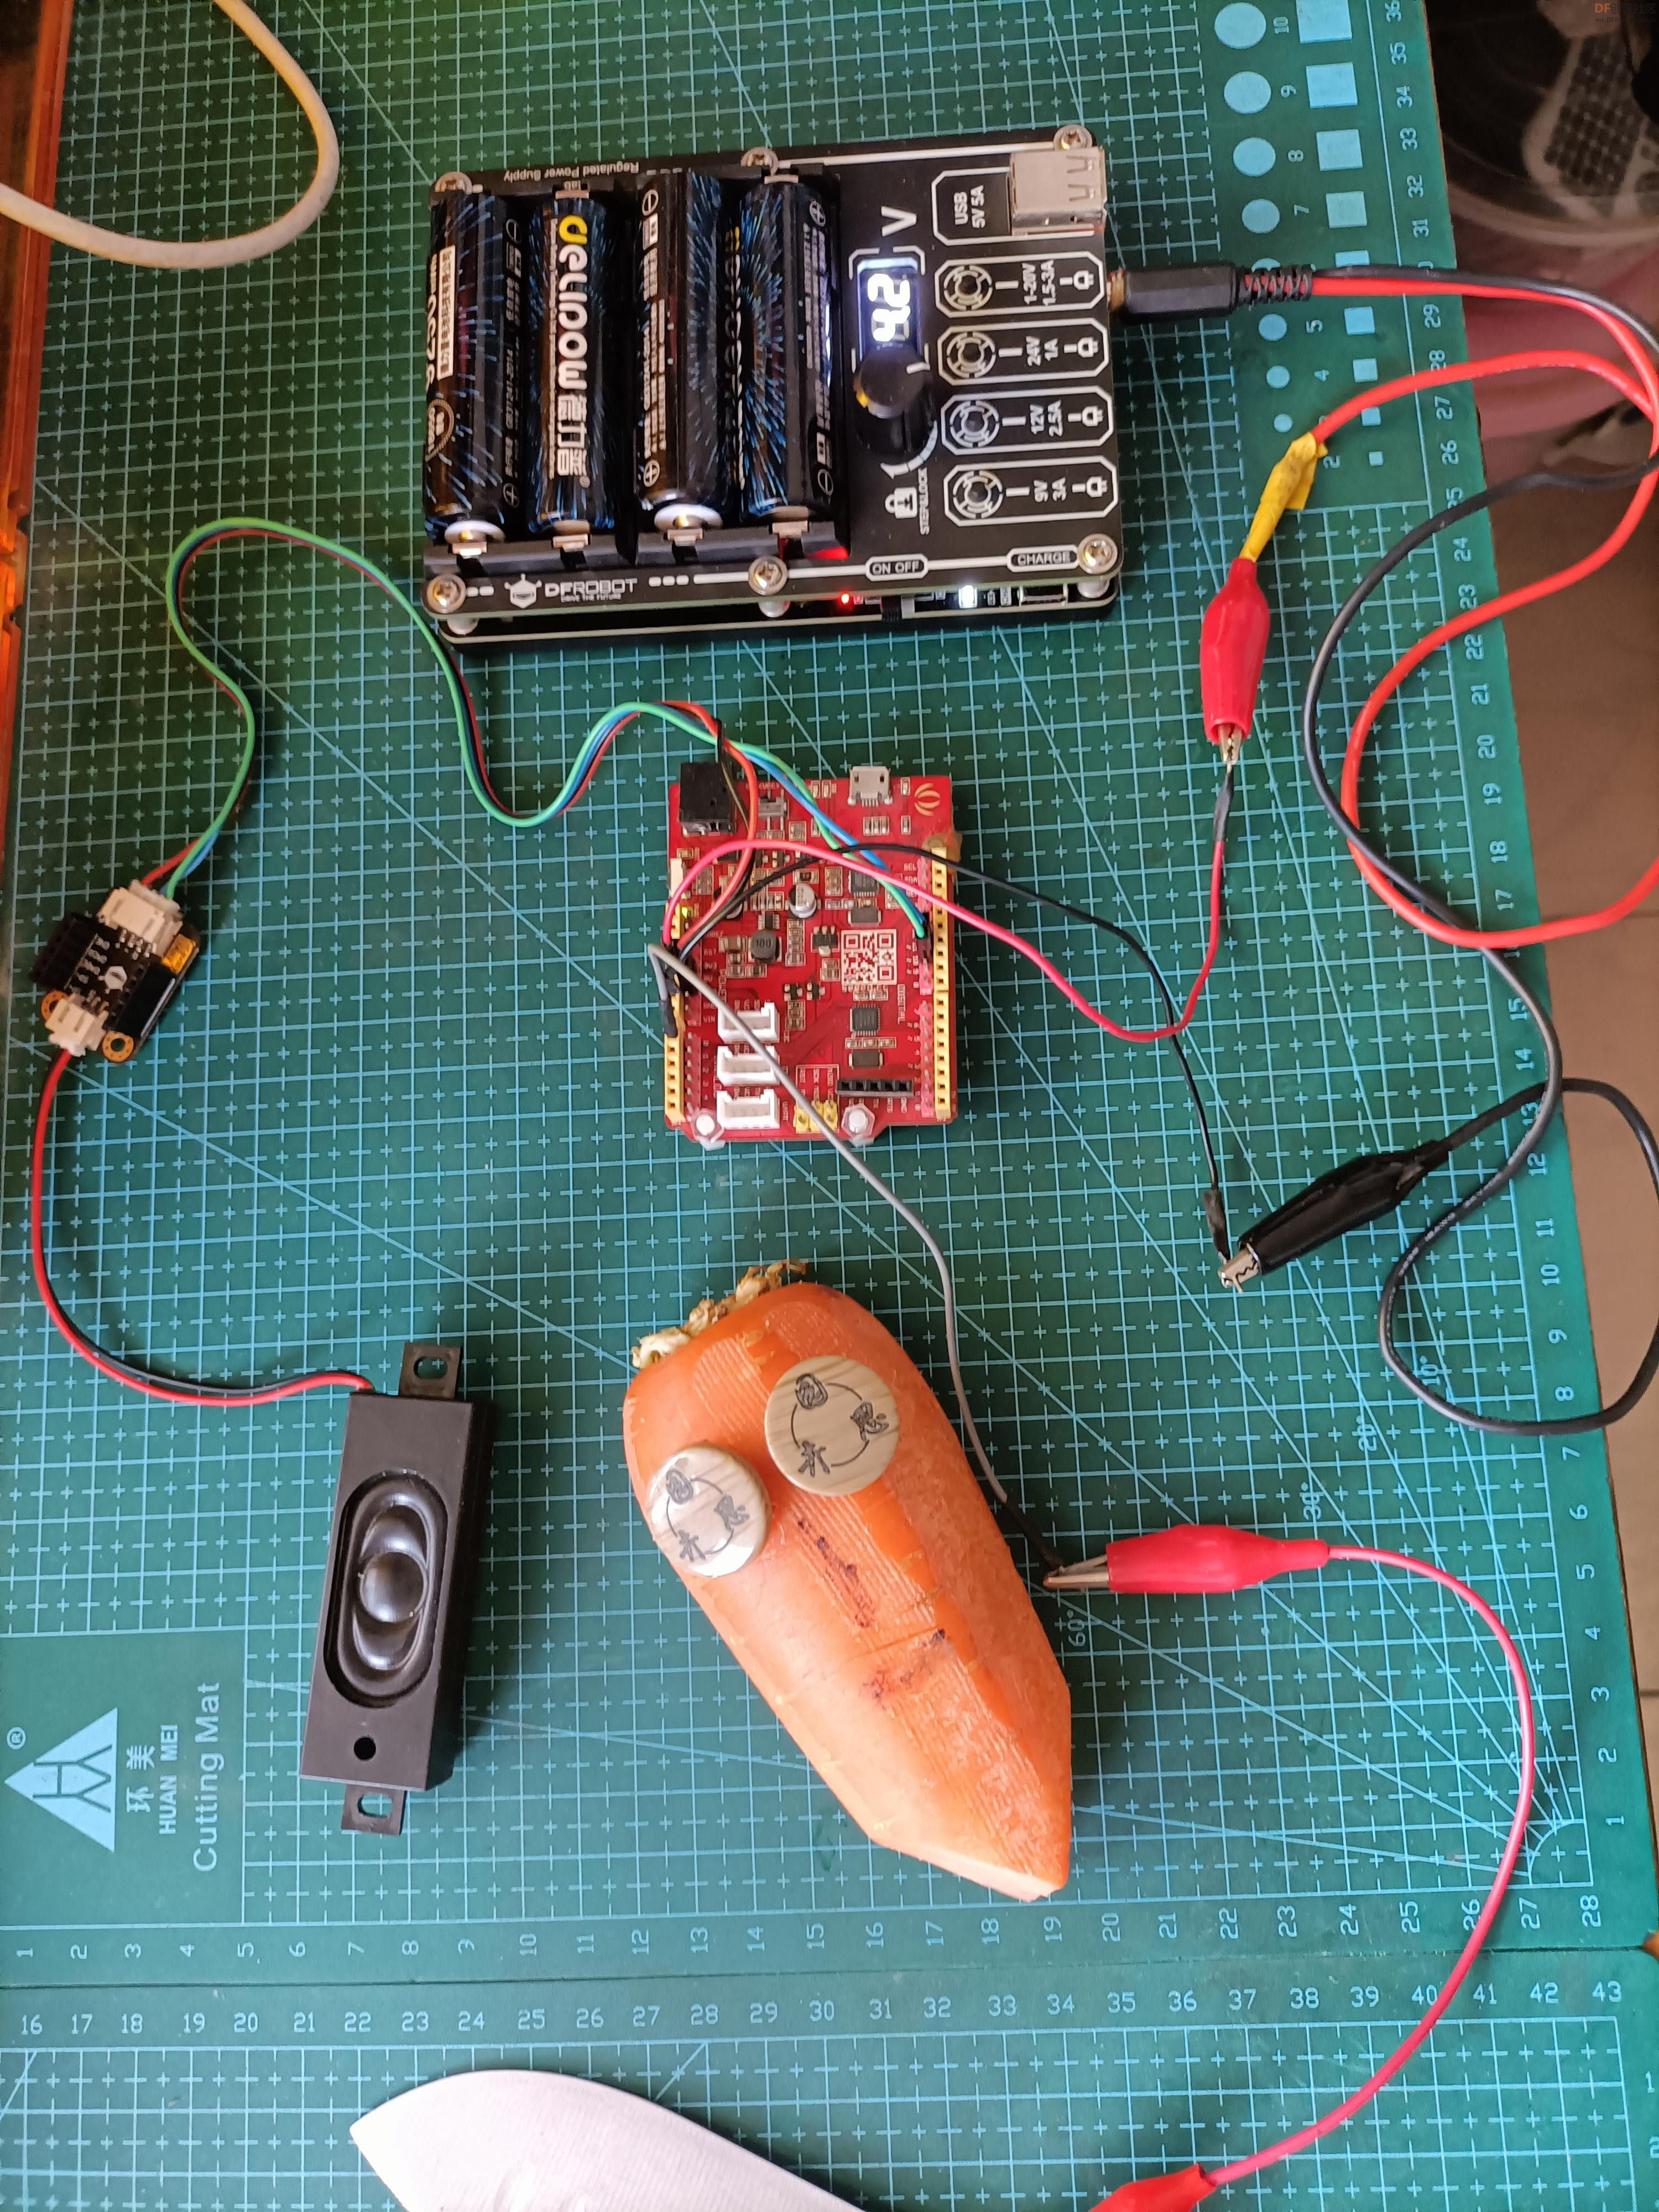
再接下来是接线图
|

 沪公网安备31011502402448

 置顶卡
置顶卡 变色卡
变色卡 千斤顶
千斤顶
 老版主限定
老版主限定
 创作达人
创作达人
 创客造
创客造
 编辑选择奖
编辑选择奖