|
RGB手势传感器简易快速入门
前言
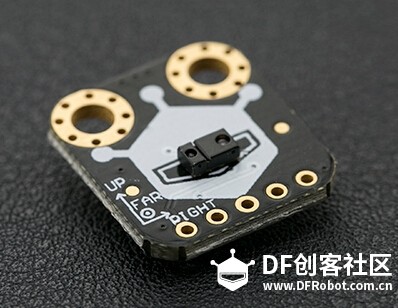
地府罗伯特,最近新推出一款功能强大的RGB手势传感器。集手势,光源强度、颜色识别为一体,尺寸却只比指甲盖大一点点,看着就让人眼馋。
为此第一时间,拿到了这款传感器,闲言碎语不讲啦。正值双十一上传个简单的测试体验。做点什么呢? 看下面的图:
没错! 手势传感器,用来检测打脸自然最合适不过啦。哈哈哈哈哈哈哈哈
零件清单:
1.SEN0187 RGB手势传感器 X 1
2.WiDo (集成Leonardo主控芯片) X 1
PS: 任何leonardo类型Arduino板子均可。
推荐 DFRobot Leonardo , Beetle控制器。
电路连接图:
备注: RGB手势传感器采用的是I2C通讯,同时在监测到有手势的动作时,INT输出一个低电平,用于触发中断。
因此将传感器的I2C Pin脚(SDA、SDL)与控制器的Pin脚连接即可,本例中断Pin脚选择(D0)。
安利下leonardo类控制板的中断引脚为(D0,D1,D2,D3),其中I2C对应的引脚为(D2,D3),因此选择中断引脚时避免与I2C冲突。
- <div align="left">#include <Wire.h>
- #include <SparkFun_APDS9960.h>
- // Constants
- // Global Variables
- SparkFun_APDS9960 apds = SparkFun_APDS9960();
- int isr_flag = 0;</div><div align="left">
- </div><div align="left"> void setup() {</div><div align="left"> Keyboard.begin(); // 开始模拟键盘
- // Initialize Serial port
- Serial.begin(9600);
- Serial.println();
- Serial.println(F("--------------------------------"));
- Serial.println(F("SparkFun APDS-9960 - GestureTest"));
- Serial.println(F("--------------------------------"));
- // Initialize interrupt service routine
- attachInterrupt(2, interruptRoutine, FALLING); //选择中断编号为2,对于的中断引脚为D0
- // Initialize APDS-9960 (configure I2C and initial values)
- if ( apds.init() ) {
- Serial.println(F("APDS-9960 initialization complete"));
- } else {
- Serial.println(F("Something went wrong during APDS-9960 init!"));
- }
- // Start running the APDS-9960 gesture sensor engine
- if ( apds.enableGestureSensor(true) ) {
- Serial.println(F("Gesture sensor is now running"));
- } else {
- Serial.println(F("Something went wrong during gesture sensor init!"));
- }
- }</div><div align="left">
- </div><div align="left">void loop() {</div><div align="left"> if( isr_flag == 1 ) {
- handleGesture();
- isr_flag = 0;
- }
- }</div><div align="left">
- </div><div align="left">void interruptRoutine() {</div><div align="left"> isr_flag = 1;
- }
- </div><div align="left">
- </div><div align="left">void handleGesture() {
- if ( apds.isGestureAvailable() ) {
- switch ( apds.readGesture() ) {
- case DIR_UP:
- Serial.println("UP");
- break;
- case DIR_DOWN:
- Serial.println("DOWN");
- break;
- case DIR_LEFT:
- Serial.println("LEFT");
- Keyboard.press(KEY_LEFT_ARROW); //键盘左键按下</div><div align="left"> delay(100);
- Keyboard.releaseAll();
- break;
- case DIR_RIGHT:
- Serial.println("RIGHT");</div><div align="left"> Keyboard.press(KEY_RIGHT_ARROW); //键盘右键按下</div><div align="left"> delay(100);
- Keyboard.releaseAll();</div><div align="left"> break;</div><div align="left"> case DIR_NEAR:
- Serial.println("NEAR");
- break;
- case DIR_FAR:
- Serial.println("FAR");
- break;
- default:
- Serial.println("NONE");
- }
- }
- }
- </div>
该程序直接选用RGB手势传感器的库的样例程序。导入RGB手势传感器库以后选择 File>>Examples>>SparkFunAPDS9960>>GestureTest
这里只修改了样例程序中的中断编号,以及增加了arduino USB键盘类函数。 因为USB键盘类库为arduino的默认库,因此不需要导入。
函数:attachInterrupt(interrupt, function, mode)
功能:对中断引脚进行初始化配置
参数:
interrupt,中断编号,注意,这里的中断编号并不是引脚编号。
function, 中断函数名,当中断被触发后即会运行此函数名称所代表的中断函数
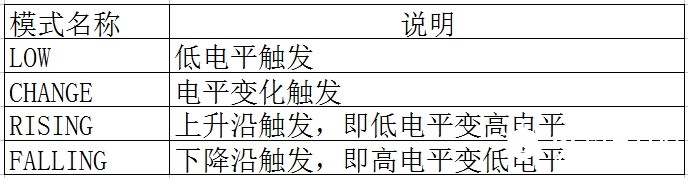
mode, 中断模式。
可用的中断触发模式 常见Arduino控制器的中断编号
函数:Keyboard.begin() 功能:开始模拟键盘
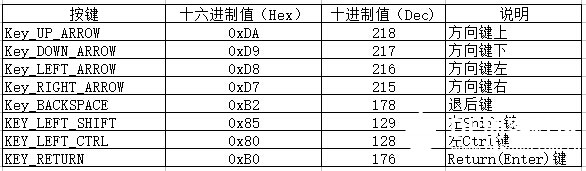
函数:Keyboard.press(char) 功能:按下按键。当调用该函数时相当于在键盘上按下一个按键并保持。注意如果需要有释放该按键动作,需要使用Keyboard.release()或者Keyboard.releaseAll()函数。 语法:Keyboard.press(key) 参数:key,需要按下的按键。
这里给出几个常用的按键参数:
函数:Keyboard.releaseAll() 功能: 释放之前调用press(char)函数按下的所有按键。 语法:Keyboard.releaseAll() 返回值:释放的按键个数
附件:
RGB手势传感器库 :  SparkFun_APDS9960.zip SparkFun_APDS9960.zip
| 


 沪公网安备31011502402448
 置顶卡
置顶卡 变色卡
变色卡 千斤顶
千斤顶